Home energy efficiency is best achieved by a “whole-house” approach, rather than a piecemeal one. Everything in your home is interconnected. When you change something, it affects other things as well.
Air follows the path of least resistance, and hot air rises. Thus, for example, if you seal up your doors and windows, but you do nothing about your attic/crawlspace sealing, the air and heat loss through the attic and from the crawlspace can actually increase, since it can no longer escape through the doors and windows.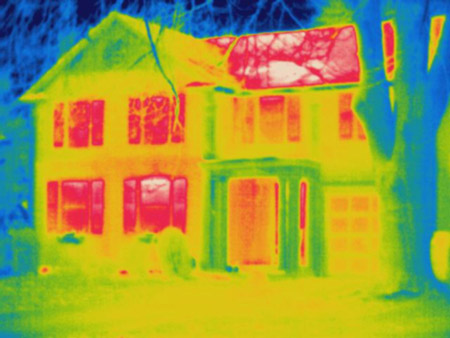
The best results come from doing the right work, in the right order. Following the steps below will provide the most effective, thorough, long-term home energy and comfort improvements, while minimizing re-work.
7 Steps: The right order to energy retrofit a home
Granted, every home is different, and you really need a full energy audit testing and software energy modelling of the home to be able to design a effective energy retrofit plan. However, this is a generic order of things so that you aren’t burning any bridges or creating more work for yourself in the future.
1) Access Your Attic
Remove existing attic insulation to gain access to the attic floor, so it can be fully air sealed. This is especially important if your insulation is:
- Deteriorated
- Improperly installed
- Mixed with roofing debris or rat waste
- Not making full contact with ceiling drywall
- Too thick to allow proper air sealing underneath
Also, if you have ducts in the attic, you will need full access to these for later re-sizing, replacement, sealing or insulating.
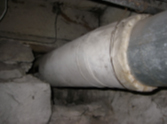
Asbestos duct wrap
2) Remove Knob & Tube Wiring, Asbestos, Crawl Space Bulk Water
If you have any of these in your house, they should be removed prior to starting the energy retrofit.
- Knob & tube wiring is an antiquated form of wiring that should never come into contact with insulation. Find out if you have any in your home and have an electrician replace it with Romex, before you install any insulation.
- Asbestos is often on the outside of older sheet metal ducts. Get a professional asbestos abatement company to remove this in a safe manner and dispose of it properly.
- Water can gradually build up in the crawl space. If you have over an inch or two of seasonal water in the crawl space then you want to take care of this first with either french drains or a crawl space vapor barrier and sump pumps.
3) Air seal the attic floor and the crawl space perimeter
The highest priorities for air sealing are the top and bottom of the building, due to the “stack effect” (the movement of air into and out of buildings, due to buoyancy driven by differences in temperature, pressure, and moisture).
Your sealed air barrier must seamlessly border your insulation. Thus, failing to air seal before installing new insulation is a costly mistake. The importance of proper air sealing cannot be overstated.
- Places to seal in a common attic: interior wall top plates, exterior wall top plates, flue penetrations, electrical penetrations, open wall cavities, dropped soffits, recessed can lights, solar tubes, bath fan fixtures, etc.
- Places to seal in a common crawlspace: perimeter of crawl space at rim joists (below exterior walls), open cavities, penetrations, etc.
4) Install Insulation
Start with the highest priority areas.
- Since hot air rises, the attic is almost always top priority. Attic insulation is generally the most cost-effective.
- Walls are usually second on the list. However, sometimes wall insulation is found to be more intrusive and less cost-effective than floor insulation.
- Floor insulation. Installing a crawl space vapor barrier is a good alternative or supplement to floor insulation.
5) HVAC
Now that your home is sealed and insulated in the highest priority areas, it is the right time to focus on your heating and cooling systems.
With steps 1-4 complete, your energy technician can now perform Manual J/S/D calculations, to get the most accurate numbers for room-by-room heating/cooling loads, airflow needs, duct size, and finally the proper size of the furnace and/or AC. This is essential, as having an oversized unit will cause it to cycle on and off, drastically reducing its efficiency.
Also, after tightening up your home and further insulating, its heat retention is vastly improved and, although the net result is likely to be energy savings, your furnace/AC is likely even more oversized than it was previously. This will cause it to cycle on and off faster and thus operate at a lower average efficiency.
6) Ventilation
If you have ambitiously sealed the home to very tight levels (~0.25 air changes per hour or less), then you will want to add a balanced ventilation system. Refer to our Ventilation page for more information.
7) Renewable Energy
If you want to further improve your energy efficiency, you may want to look into a solar photo voltaic (PV) system. This should only be considered after all the above steps are complete. Just as one shouldn’t size an HVAC system for an uninsulated leaky home, one shouldn’t size a solar system for an inefficient home.
Get in contact:
[dropshadowbox align=”none” effect=”lifted-both” width=”640px” height=”” background_color=”#ffffff” border_width=”1″ border_color=”#dddddd” ]For more information about deep energy retrofits, call (925) 363-4498 to speak to a technician or schedule an Energy Audit. You can also e-mail: info@epbuilders.com[/dropshadowbox]
Read our Testimonials from happy homeowners!
[…] EUC (Energy Upgrade California) can provide up to $4,500 in rebates for efficiency upgrades. It focuses on a whole-house approach. […]