Do It Yourself – Home Energy Audit
What is a Residential Energy Audit?
(often more positively termed: Energy Assessment)
An Energy Audit is a way to use Building Science and Home Performance concepts to perform a comprehensive in-depth testing of a home in order to find out where the energy concerns are, how to prioritize taking care of the energy issues, how to improve the comfort of the home and how to solve indoor air quality problems. A professional energy audit should always be followed by using energy modeling software to model the energy situation in your home. Whether your goal is to reduce your monthly energy bill, feel more comfortable, improve indoor air quality, or to make your home greener, these are all issues addressed by an energy audit and energy upgrade improvements.
Testing for building leakage, duct leakage, HVAC appliance efficiency, combustion appliance safety, infrared scanning for insulation effectiveness, room to room airflow testing, asbestos detection and energy modeling all involves specialized equipment and should be done by a certified professional. However, there is also plenty that a homeowner can do themselves to help pinpoint and identify problem areas and start to get an idea of which issues should be prioritized and tackled first.
Below is a list of do-it-yourself ways to investigate the energy situation in your home ordered in terms of fast and easy to more in-depth:
Contents
Part 1: Air Leakage
Part 2: Analyzing Energy Bills
2.1 What can I learn from my energy bills?
Part 3: Insulation
3.1 Where is the Insulation in my home?
3.2 How is Insulation measured and rated?
3.3 What should I look for with my Attic Insulation?
3.4 How can I examine my Duct Insulation?
3.5 How can I examine my Wall Insulation?
3.6 How can I inspect my Floor Insulation?
3.7 Frequently Asked Questions (FAQs)
Part 4: Electrical Appliances
4.1 How can I test the Wattage of my electrical appliances?
4.3 How to test the appliances that aren’t plug in?
4.4 What can I do now to lower my electric bill?
If you want to go more in depth yourself, the Department of Energy has created a free, light, online energy modeling tool for homeowners that many have found very useful. Find it here at this link:
Past a certain point, many things about a home can only be tested and modeled by Energy Audit professionals with the proper training and equipment. Call (925) 363-4498 to speak with a Residential Energy expert.
PART 1: AIR LEAKAGE
1.1 What is home air leakage?
After air sealing performed
Air leakage is the where unconditioned outside air (crawlspace, attic or out the sides of the building) exchanges with the conditioned air inside the home. It is one of the primary ways energy can be lost in a home. Even with the rise of the green building industry, the huge majority of homes are not built to be “tight”. Air leakage is a major source of energy loss and the CA state average is far above what it should be.
A good target goal for sealing up a home is to get it to the point where about every 3 hours, all the air in the home is replaced by unconditioned air (around 0.35 air changes per hour). This still sounds like a lot of leakage, however, the average residential building leakage is much higher. In fact, this rule of thumb is important for maintaining good air quality.
In order to get a professional quantitative building leakage test performed on your home, call a professional energy auditor who is trained to use Blower Door equipment. This is a basic part of a professional energy audit and involves setting up a high powered fan in an exterior door to test the leakage of the building as a whole. For getting a visual assessment on the building leakage read below:
1.2 Where are my air leaks?
There are two very different kinds of air leaks in terms of where the air is coming from:
1) leaks from the top and bottom (attic and crawlspace).
2) leaks from windows, doors and other leakage points out the sides of your home.
The difference is that, since hot air rises, the top and bottom should be sealed first as a priority. Also, a leaky window leaks fresh air whereas a leaky crawlspace (below the home) leaks very poor air quality air that can sometimes be even colder.
[nggallery id=10]
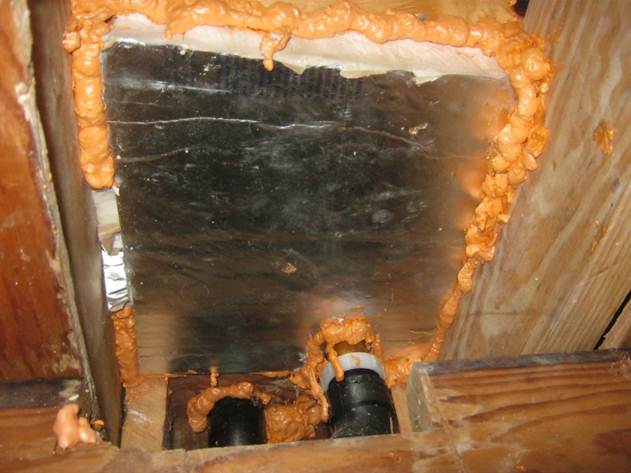
In the crawlspace and attic (if you are willing to explore here!) you should be looking for unsealed holes around plumbing pipes, electrical cords and any other similar penetrations. Also, look for places where building materials meet. Every home has leakage in these locations. Homes are simply not yet commonly built with energy conservation in mind.
For finding indoor leaks here is a trick. First turn on all bathroom fans and your kitchen range hood exhaust. This is to depressurize the house a bit. Next, light a stick of incense and move it close to windows, doors, baseboard where the wall meets the floor and at junctures along walls and ceilings. Watch to see where the smoke wavers, this means you have outside air leaking in or and/or cooled/heated inside air leaking out.
Do you feel drafts in your home? Is there a large/uncomfortable temperature difference from floor to ceiling? Does your home not retain heat in the winter and is it heating up too quickly in the summer? Although there are many factors that contribute, answering yes to the above questions is a good indication that there is far more air leakage in your home than there should be.
1.3 What to do about it?
a) A common thing that homeowners can do is buy some window/door weather-stripping at any Home Depot, Lowes etc. Also, weather-strip the attic hatch and make sure it is insulated on top.
b) Check your fireplace damper. Does it close all the way? Do you feel a draft when it is closed? You can buy a Chimney Balloon online for fairly cheap (around $30) and very effective. It is an inflatable plastic that you leave in your chimney to prevent air leakage. Just do a quick search online to find one.
c) The priority Air Sealing (attic and crawlspace) should be sealed with spray foam insulation that is often applied using a spray foam gun with refillable canisters. Target all those previously mentioned locations in the attic and crawlspace with this material. Careful not to use any spray foam on the interior or on recessed can lights in the attic that are not allowed to be in contact with insulation (Non-IC rated recessed cans).
[nggallery id=11]
Maneuvering in the attic and crawlspace can be very strenuous and dangerous and finding the leaks very difficult if there is existing insulation in the way. It is often best to hire a home performance professional for this. A good home performance contractor will perform a Blower Door test before the work and after to see the progress and make sure the target reduction in leakage has been met.
Back to Contents
PART 2: ANALYZING ENERGY BILLS
2.1 What can I learn from my energy bills?
 Bills are never much fun, but there is a lot to learn by taking a deeper look at your energy bills. A few simple things to help you get to know your usage patterns:
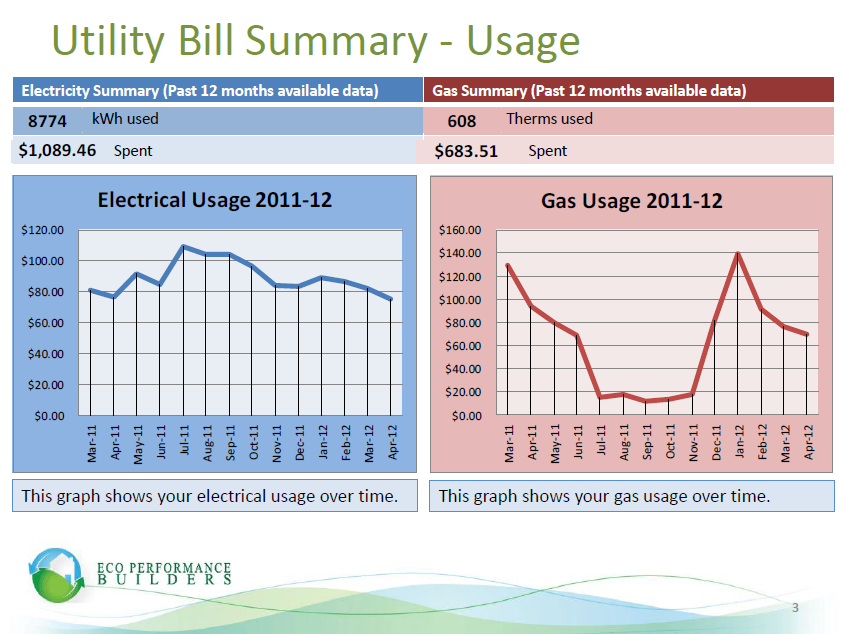
a) Look at your electrical bills separate from your gas bills. If you have an Air Conditioner you may see a spike in electrical usage in the summer. Compare, month to month, the size of this spike to previous years and try to figure out why it has gone up or down (kids home for the summer, programmed thermostat, new appliances, change of habits).
Now look at your spring, fall and winter electrical bills. An average of your bills during these months can be considered your base load electrical usage. This is from things like lights, computers, home entertainment systems, pool pumps that run all year and much more.
b) Look at your gas bills separate from your electrical bills. You should see a similar spike in the winter if you have a gas home heating system. The gas base load is most likely due to things like gas water heating and cooking.
c) Depending on your area and provider, electrical usage is often on a tiered payment system. This means that the more you use each month, the more you pay per kilowatt each month. Gas usage is also tiered, just not to such an extreme as electrical usage. This means that savings can be huge if reduce usage enough that you lower yourself to a lower tier payment rate. California’s PG&E utility provider tiered payments fluctuate seasonally and based on climate zone but in general they can range from $0.13 per Kilowatt hour (kWh*) for the baseline or first tier costs to $0.34 for the tier 4 or 5 costs. At the beginning of each month to start over at around $0.13 per kWh. Once you have used a certain amount then you are boosted up to the next tiered cost per kWh. To find out what the tier usage cutoffs and rates are exactly (specific to your area) then visit your provider’s website or give them a call. Most make the information readily available, if not a little complex.
*note: a kilowatt hour (kWh) is one kilowatt of power being used for one hour
Back to Contents
PART 3: INSULATION
3.1 Where is the Insulation in my home?
There are four main categories of insulation in the home: Attic insulation, Duct insulation, Wall insulation and Floor insulation. Due to the rising costs of energy, the recommended level of insulation for each of these is often higher now than it was when your insulation may have been installed. The insulation may be too thin, installed improperly, has deteriorated, is uneven or may be missing entirely.
3.2 How is Insulation measured and rated?
Insulation is measured by its R value (resistance to heat conductance) and each area of the house has its own common minimum standards. The attic minimum is R38, duct insulation is R6, wall is R13 and floor is R19. If installed incorrectly (uneven, not in full contact with building material or compressed) the insulation is likely not even close to these values. It is also important to note that these are minimum recommended levels and higher R values (ex: R50 for attic, R8 for ducts) will usually give you a shorter return on investment, depending on your existing energy bills.
Every insulation type has a rated optimum R value per inch:
| R value / inch | Typical Application | |
| Cellulose, loose fill | 3.7 | Attic floor (R38 minimum) |
| Cellulose, high density | 3.2 | Walls, Enclosed Cavities (R13) |
| Fiberglass, batts | 3.0 | Basements, Crawlspace, Open stud walls, Attic floor |
| Fiberglass, loose fill | 2.8 | Attic floor (R38), Walls (Less than R13) |
| Poly-isocyanurate, rigid board | 7.0 | Foundation walls, Attic access doors, Cathedral ceilings |
| Polystyrene, expanded rigid board | 4.0 | Foundation walls, Sill plate, Cathedral ceilngs |
*Note: These values are from BPI Standards (Building Performance Institute).
From the above listed R values you can measure your overall average R value simply with a tape measure. The insulation should be devalued from there if there are any bare spots or very thin spots. If you are having trouble identifying your insulation type then compare it to some photos and descriptions on one of our insulation pages.
3.3 What should I look for with my Attic Insulation?
Checklist of things to ask yourself while looking around in the Attic:
- Is the insulation in complete contact with the attic floor (sheetrock)?
- Is the insulation an average of 12 inches or more (general rule of thumb)?
- Is the insulation consistently installed throughout the attic?
- Has the attic floor been air sealed prior to attic insulation installation? (see Air Leakage)
- Is there existing Knob & Tube wiring? (Insulation should not be in contact with this)
- Are there recessed lights that are not rated for being in contact with Insulation? (from the inside of the house, remove the bulb and trim and look for a label that indicates IC rated or not)
- Has the Insulation appeared to have settled over time or broken down and deteriorated? Or is there rat waste and roofing material mixed in?
- Commonly overlooked are the vertical walls in the attic where living space is on the other side. These are called “knee walls” and are often very leaky and poorly insulated. You will see these if you have cathedral ceiling next to an attic space or all 4 sides of a skylight.
- IMPORTANT: Are your Ducts in the attic? If so, this is an opportunity. A homeowner, with the help of a home performance professional, should first make sure the ducts are sized correctly, insulated and sealed before installing more insulation. A well-insulated attic is very difficult to work in and maneuver around, and so to do this out of order would be burning some bridges. The correct order is: 1) air seal attic floor, 2) seal/replace ducts, 3) attic insulation. Secondly, ducts in an attic mean that they can be buried (after they have been sealed) in additional attic insulation to save a great amount of energy per dollar spent.
[nggallery id=6]
3.4 How can I examine my Duct Insulation?
Checklist of things to ask yourself while examining your Duct System:
- Check for sufficient insulation on your duct system (may be above or below your home)
- Is your duct insulation labeled (often not the case)? If so, what is the listed R value (2.1, 4.2, 6, 8)? Is the insulation in complete contact with all duct lines?
- Are there dirty spots/rings/streaks in the duct insulation (an indication of high duct leakage at duct connections)? Unfortunately, high duct leakage is very common. In fact, the CA state average for how much air that you are paying to heat/cool is leaking out of your duct system is 30%. High duct leakage means air passing through the duct insulation layer. This, in turn, reduces the effectiveness of the insulation.
- Is there Asbestos on my ducts? Before California banned the use of asbestos in homes in 1972, it was commonly used as a duct tape and insulator. Although commonly thought of as less volatile than asbestos popcorn ceilings, for example, it is still a long term health concern and indicative of a very inefficient, leaky, costly duct system as well. Look for white tape (or wrap) on rigid sheet metal ducts. Also, look for a silvery semi pleated material. Both of these are asbestos and requires a professional asbestos abatement company to remove.
- What type of ducts do I have? From oldest to newest the common types are: Rigid sheet metal ducts, Aluminum flexible ducts, Plastic flexible ducts. If not clearly visible due to the insulation, push lightly on any given duct line. Sheet metal rigid will have no give to it, aluminum flex ducts will partially give but still feel semi rigid, and plastic flex ducts will have a lot of given and are able to be compressed and pop back. Plastic flex ducts are superior in that they: a) come with more insulation in general, b) provide less air flow resistance, c) more durable, d) easier to seal up.
- How is my duct system laid out? In short, the ideal system is: a) plastic flex duct, b) has been correctly sized and engineered on a room by room basis, c) has as-short-as-possible direct duct lines with no sag, d) Doesn’t “Branch out” or split from a main trunk line and instead has one run from the furnace going all the way to each supply register, e) each run has an in-line damper to adjust airflow and balance the system (often seen as an adjustable lever or butterfly screw on one of the sheet metal connections). A home performance engineer professional should be contacted for a further in depth analysis.
Read more here about what is involved in Properly Engineered Ductwork
[nggallery id=8]
3.5 How can I examine my Wall Insulation?
Checklist of things to ask yourself while trying to examine your Wall Insulation:
- How can I check if I have any Wall Insulation (often nonexistent)? Without having access to an expensive Infrared camera, the only way to easily check your wall insulation is by removing exterior wall electrical socket covers and trying to see through the gaps in the drywall to the inside of the wall. Try to inspect many to confirm as sometimes it is very hard to see in the small gaps. More often than not, you are looking for the existence of fiberglass batts in your walls. BE CAREFUL not to poke around the socket with metal objects.
- Can wall insulation be determined from the age of the home? Pre 1970s – 80s homes often have no wall insulation. However, it is very common that parts of a home have been renovated and partially insulated at that point. If you are planning a renovation yourself, never miss the opportunity, of taking down drywall, to add insulation or reinsulate properly.
- What kind of Insulation is in my walls? Again, very hard to say without an infrared camera or a view inside the wall. Fiberglass batting is VERY common and often installed quickly and poorly. Installing fiberglass batts would require all the drywall to be removed prior. Other options can be read on our insulation page.
3.6 How can I inspect my Floor Insulation?
Checklist of things to ask yourself while looking in your crawlspace (under the house):
- Do I have Floor Insulation? First, check for the existence of floor insulation (often nonexistent) – This is a simple matter of poking your head into the crawlspace or looking upwards at the bottom of your floor.
- How well is my Floor Insulation installed? It is very common for floor insulation to be installed poorly and is sagging or falling down. Unlike with attic insulation, gravity is working against you here. Floor insulation (almost always batts) needs to be supported very frequently with well installed metal rods (nicknamed lightning rods) that are wedged, between the joists just below the insulation batt, in such a way that the tension in the rod is providing solid support for the batt. Bale wire can be an effective way to support a batt as well if done correctly.
- What does ineffective floor insulation look like? Look for any areas where the batts: are sagging, have been stapled to the floor or compressed at any point, are not filling the joist bay, are being held up by netting that is compressing the sides, where rats have made nests or have been smushed into unusually small spaces. If any of these things are the case then your insulation cannot be anywhere near the intended R value (R19 usually).
- I have a concrete slab, what are my insulation options? Unfortunately, very few options exists for slab insulation on an existing home. One would need to perform a serious renovation of the slab to be able to install insulation. In this case, the preferred type would be rigid board insulation as listed in the previous table. If you have radiant floor hydronic heating then having the slab insulated is essential to have an efficient system. The perimeter of the slab should also be insulated in this case.
[nggallery id=4]
3.7 Additional Insulation FAQs (Frequently Asked Questions)
1) I heard bad things about certain insulation types lowering indoor air quality, can this happen?
Yes, certain types of fiberglass, for example, still have formaldehyde being used as an ingredient in an adhesive for the batt. Also, breathing in fiberglass that has been disturbed and airborne is not good for your long term health. However, there are many brands of fiberglass being made now that are formaldehyde free and also have high recycled content. Denim, although much more expensive as an insulation material, is sometimes chosen as it is better for indoor air quality.
However, the importance of all of this is greatly lessened when one effectively seals up the ducts, and performs effective air sealing on the floor of the attic and in the crawlspace as well. The air quality in the attic and crawlspace is much less of a concern if there is no way for it to interact with the air in the home.
2) How can I insulate if I have an inaccessible flat roof or cathedral ceiling?
First off, if you happen to have plans on redoing the roof anytime soon then wait for that opportunity to insulate from the top before redoing the roof. If not, then it becomes very case specific. Sometimes rigid foam board insulation can be installed in a cathedral ceiling, sheetrock installed under and therefore dropped a little bit. This tends to be rather pricey. Other times, it is sometimes possible to drill holes in an inaccessible ceiling space to blow in cellulose insulation in each cavity. This is very tricky and a contractor must be careful to ensure there is at least 2” between the insulation and the roofing material. Otherwise there can easily be condensation issues and mold/fungus forming.
3) How does an Energy Auditor inspect insulation?
Much in the same ways as described above in this article. An energy auditor professional should be thorough in inspecting the entire attic and crawlspace for issues. They should know every type of insulation out there with their associated pros, cons and R values per inch. Energy auditors are also trained in using an infrared camera from within the home to find thermal leaks that may otherwise not be visible.
4) How should I prioritize Insulation projects?
The fact that heat rises makes attic insulation the most beneficial in terms of comfort and energy savings. Next up is wall insulation. However, this project is often costly and sometimes intrusive. So although it would provide more comfort and energy savings than floor insulation, floor insulation tends to have a higher return on investment due to the fact that it is cheaper.
Insulation is a home performance basic. It is the way heat is retained in the winter and kept out in the summer. Spend the time to research the types and varieties of insulation and a home performance contractor who can do a quality energy assessment and insulation installation. If you want to talk to a residential energy professional or schedule an Energy Audit then call us at (925) 363-4498.
Back to Contents
PART 4: ELECTRICAL APPLIANCES
4.1 How can I test the Wattage of my electrical appliances?
Appliances can be costing you more than they should or more than you expect. Even the little ones that you think may be minimal can add up to a high annual cost. So the goal here is to find out which are the most power hungry and try to cut down on usage from there. First you may want to buy or borrow a Kill-A-Watt Electric Usage Monitor. They are an amazingly easy to use tool that costs around $20-$25 online. All you do is plug it into a wall socket, and then insert the plug for the electronic device that you wish to monitor. It will give you detailed info on energy use, and even has a “$ cost button” to show you how much the unit costs you to operate over time. Be careful to record the information before you unplug it or else the information will reset and will be lost.
Begin by checking your major appliances with the Kill-A-Watt: Refrigerator, garage freezers, TVs, home entertainment systems, electrical dryers, washers, computers, charging cell phones/laptops etc. Note that the Kill A Watt can either record power usage over time (accurate!) or instantaneously (often not accurate for appliances that fluctuate in power demand – TVs, fridges, dryers etc).
4.2 Organize the Data
Write down the power usage and try to calculate how much each uses over the course of a year. Some may surprise you on how little or how much they use. Map it out and make a chart like this one:
Appliance | Average measured power demand (kW) | My average cost per kilowatt hour (kWh) | Estimated # of hours being used a day | Daily Cost (multiply all 3 previous boxes together) | Annual Cost (previous box *365) |
| Refrigerator | |||||
| TV | |||||
| Coffee Maker | |||||
| Microwave | |||||
| Electric Dryer |
*note: a kilowatt hour (kWh) is one kilowatt of power being used for one hour
Test out as many appliances as you can and add up all the annual costs. Now compare it to your annual electric bill. It will most likely to reach your annual bill total. This is because there are many other appliances that cannot be tested with a Kill-a-Watt (i.e. are not plugged into a socket).
4.3 How to test appliances that aren’t plug in?
For these appliances that you can’t test with a Kill-A-Watt (pool pumps, air conditioner, whole house fans, the fan blower on your furnace, lights etc) you can use your electric smart meter. Most PG&E customers have one outside their home now. Locate it and take a look at it. It switches through a few display modes every few seconds. Look for the display where it shows the instantaneous power usage in the whole home (kW or W). Write that down and then go turn on or off the appliance in question. Then go back to the smart meter and write down the new total usage. Assuming nothing in the house kicked on or off other than that single appliance, the difference between the initial number and the new number will be the power demand specific to the appliance in question. Add these to the table you have created above.
4.4 What can I do now to lower my electric bill?
1) Refrigerator:
If your fridge and freezer are using too much juice, you may simply need to turn down the temperature dials, clean the coils, or clean/repair the door seals. In general the EPA recommends keeping refrigerators at 37 degrees F and freezers at 3 degrees.
2) Air Conditioner:
This is a complex topic. There are many reasons why an AC is costing more than it should: a) low efficiency (SEER rating), b) poorly designed duct system, c) leaky duct system, d) poorly insulated duct system, e) high wattage air handler, d) oversized AC unit, e) requires servicing (refrigerant charge verification etc) and more. Find your Make and Model on the label of your outdoor AC unit and look it up online to find the SEER and the tonnage (size). For a more in depth look it is recommended to contact a home performance professional.
3) Phantom (aka Vampire) loads:
These are loads from appliances that draw power even when they are supposedly “off”. This is usually a 24/7 power load and can add up to be a high cumulative annual cost. Appliances that commonly have these issues are: Computer systems, Home entertainment systems and more. The only way to eliminate these phantom loads is to cut power to the appliance. However, unplugging it every time is often inconvenient. The solution is to purchase a Smart Power strip. These are power strips (surge protectors) that have a designated Master outlet. When the appliance plugged into the Master outlet is turned off then power is automatically cut to the appliances plugged into the associated outlet slots. For example, plug a desktop computer tower into the Master outlet. Plug the speakers, monitor, keyboard etc into the associated connected outlets. That way, when you turn off your computer, power is cut to the appliances that often drain a little bit of power all the time. Be careful when plugging in routers/modems and cable boxes to the associated outlets as they often take a while to start back up and can be very annoying. Instead, plug those into the “always on” outlets on the Smart Strip.
4) Pool Pump:
There have been excellent breakthroughs in pool pump motors in the past few years. They are lower horsepower (and wattage), variable speed, quieter and more customizable these days. Replacing a non-variable speed pool pump with a variable speed one can often pay itself off in a few years. If you just want a quick way to save some money then reduce the number of hours your pool pump is set to run per day to 3 hours. That may seem low, but the Department of Energy did a study and found out this is all that is necessary to maintain good water quality. Unless your pool is unusually gigantic then consider doing this and see how much you are saving. You can always turn it back to the original settings. It is a common problem that many pool pump installers will recommend running it many more hours than necessary to ensure minimum call backs.
5) Lights:
This is a vast topic as well. Examine your light fixtures first to see what you have (wattage is often written on the bulb itself). Then decide which areas of the house you light the most. Here are some good summary points:
a) General light technology efficiency hierarchy:
LEDs > CFLs (compact fluorescents) > Fluorescents >>> Incandescents > Halogens
b) Should I wait for my incandescent/halogen bulbs to burn out before replacing?
Probably not. Depending on how often you use that light or light fixture, it is most likely a cost effective choice to replace with a reliable brand of CFL or LED lighting. Both will give you pretty quick return on investment (CFL’s ROI will come sooner as they are relatively much cheaper currently).
If you are concerned about the waste of tossing a perfectly good bulb then think twice. It is merely glass, metal and filament. Compare this to the difference in wattage. That electricity had to come from somewhere. Whether it came from nuclear, hydroelectric, natural gas, wind, solar, geothermal or any other power source, there was an inherent cost in generating the electricity. Then there is transmission loss in getting the power to your home. All these things add up to dwarf the environmental impact or inherent energy associated with producing and disposing of an incandescent light bulb.
c) I hear CFLs (Compact Fluorescents) are bad for the environment because of the mercury they contain, is this true?
It’s true that they contain mercury vapor that will eventually get into the ground water if they are broken and not properly disposed of. Consult your local city or county for the proper way to dispose of these.
However, consider this. When a Coal Plant burns coal to produce electricity, significant amounts of mercury (along with many other things) inevitably accumulate in the local environment as well. So if people are responsible enough to dispose of a CFL or Fluorescent properly then they are less detrimental to the environment than continuing to use inefficient lights.
[dropshadowbox align=”none” effect=”lifted-both” width=”640px” height=”” background_color=”#ffffff” border_width=”1″ border_color=”#dddddd” ]Contact: For more information about Energy Assessments, call (925) 363-4498 to speak to a technician or schedule a Professional Energy Assessment. You can also e-mail: info@epbuilders.com[/dropshadowbox]
Speak Your Mind