 Let’s face it, some homes need a lot of work. In the 20th century, the majority of homes were built with little consideration for efficiency, air quality, or longevity. Now that we’re facing more serious economic, environmental, and energy issues, we need to start doing things differently. But new, efficient homes are not being built fast enough to have an immediate effect on these problems. If we want to get serious, we need to improve our older homes as well.
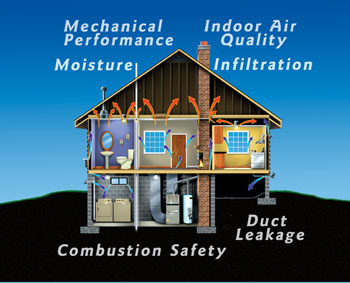
We’re not talking about just slapping in some double paned windows, insulating the attic and calling it a day. We’re talking about testing homes first to figure them out and looking at them holistically. First, the homes’ retention should be increased by reducing leakage in the priority locations (attic & crawlspace usually), insulating correctly and then sizing the heating/cooling supply system to precisely match those lowered needs. This is often called a Deep Energy Retrofit.
When we’re done, you will immediately see and feel the benefits. Heating and cooling bills will plummet, air quality will improve, the temperature will be even from room to room and from floor to ceiling, the properly sized and well designed system will be completely quiet, and your conscience will be a little clearer for helping save energy. Furthermore, we monitor the results of our work, to ensure its quality and long-term reliability.
EPB’s Step-by-Step Deep Energy Retrofit Process
Here is an exhaustive list of the work (in general) needed to turn a low-performance home into a high-performance one. Keep in mind, every home has different priorities. To find out what your home needs, schedule an Energy Audit. The goal of the list is to also provide a sensible order for the work to be performed:
1. Remove old attic insulation, dust, debris, rat waste, and other nasty stuff.
2. Remove existing duct work and mechanical units.
3. Air seal the entire house, focusing primarily on air sealing the attic and crawlspace.
4. Prep the attic for insulation:
-Install rulers to measure insulation depth and ensure an even installation. Also, to serve as an insulation dam, raise up the attic hatch framing, catwalks, attic storage, service platforms etc so that the proper depth of insulation can be installed underneath.
-Install baffles at the attic perimeter, which serve to maintain eave attic ventilation while not compromising insulation at the attic perimeter
-Protect recessed light fixtures
-Ensure that bathroom exhaust duct(s) are sending air outside through the roof like they’re supposed to (frequently not the case)
5. Engineer and install a properly sized duct system, using Manual J calculations (heating and cooling load calculations).
6. If needed, install vapor barrier(s) – AKA Crawlspace Encapsulation or Crawlspace Conditioning
7. If needed, install floor and/or wall insulation at this point (this can be done earlier on in the energy retrofit process as well)
8. Install properly sized, high efficiency mechanical units, such as:
Furnace
Air conditioner
Heat pump
Hydronic air handler
9. Fully seal the duct system (may require repeated sealing and testing until zero leakage is achieved) and then balance the system’s airflow until each room is getting the target desired airflow measured in Cubic Feet per Minute (CFM).
10. Install ventilation system:
HRV/ERV
Other options
Kitchen/bathroom fans
11. Insulate the attic and fully bury any ducts in the attic in additional insulation
12. Final building leakage testing. Also, test the heating/cooling system’s static pressure and heat rise. Static pressure is the measure of airflow resistance in the system and should be very low in a well designed system. Heat rise it to ensure the system’s settings are correct and the desired air temperature is being produced by the units.
Notes/Points:
- We almost always recommend doing window upgrades last, if at all. Doing it first often cuts off a source of fresh air (window leaks) while causing the unsealed attic and crawlspace to leak more than they did previously (not air you want to be breathing). If you’re going to redo your windows in the near future after the retrofit project, let us know! It will require slight adjustments to the planning of the heating/cooling system to account for that scenario.
- If you have an old, possibly leaky duct system in your attic, don’t bury it in insulation! Make sure your system is exactly how you want it before blowing in attic insulation.
- We cannot overemphasize the importance of doing everything together. A piecemeal approach will never achieve the same level of performance or comfort and would lead to potentially more work in the future. The goal is to do everything right the first time and to not have to think about it afterwards. A properly designed heating/cooling system will last much longer than a standard oversized and poorly designed one.
[dropshadowbox align=”none” effect=”lifted-both” width=”640px” height=”” background_color=”#ffffff” border_width=”1″ border_color=”#dddddd” ]For more information, call (925) 363-4498 or e-mail info@epbuilders.com to speak to a technician, or schedule an energy audit.[/dropshadowbox]
Speak Your Mind